Auteur/autrice : FabKzo

  • Equirectangular to cubemap bash script

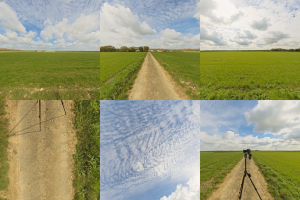
    I was working on another try to use blend4web for a personal application, and I remembered that if you want to use an environment map it has to be a Blender specific 2 rows cubemap ( 2*3 cubes faces).
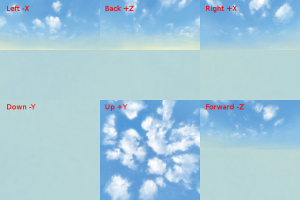
    blender cubemap
    Blender cubemap

    I’ve found ways to make it with gimp, after using Bruno Postle’s panotools script ( erect2cubic Erect2cubic ), or directly inside Blender (link 1: Blendswap cubemap maker , from : cubemap making inside blender).


    But all those ways needed to treat each panos one after the other; too long when you have to transform 20 panoramas…
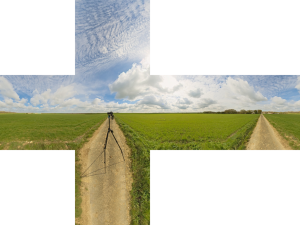
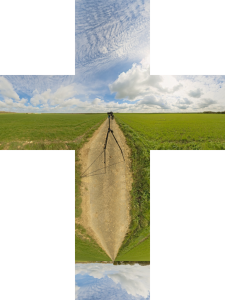
    So I wrote a little bash script to transform equirectangular panoramas initially to those specific cubemaps, then I extended it to match further types of cubemaps ( it seems that unity uses cross styled cubemaps ).

    #!/bin/sh
    # 2016 11 03 sh script
    # This script aim to transform an equirectangular pano to a cubemap image used for environment mapping
    # it uses : Hugin, Bruno Postle's panotools scripts (perl) ,imagemagick's "convert" and montage command line tools and zenity for gui.
    # Find it useful ? Any bugs, ideas?, mail me at : mail@fabkzo.com
    # Author: FabKzo www.fabkzo.com
    
    pano=0
    order=0
    front=cube0000.tif
    right=cube0001.tif
    back=cube0002.tif
    left=cube0003.tif
    up=cube0004.tif
    down=cube0005.tif
    
    createPano (){
                        #create pto file
                        erect2cubic --erect=$pano --ptofile=cube.pto;
        
                        #create each cube faces
                        nona -o cube cube.pto;
                        imgsize=$(identify -format %h cube0000.tif);
                        echo $imgsize;
                        }
    blendercubeMap (){
                        convert $left $back $right +append cubeUp.tif;
                        convert $down $up $front +append cubeDown.tif;
                        convert cubeUp.tif cubeDown.tif -append toTo.tif;
    }
    
    horizontalcross (){
                        montage null: $up null: null: $left $front $right $back null: $down null: null: -geometry $imgsize -background none -tile 4x3 toTo.tif;
    }
    
    verticalcross (){
                        convert -rotate 180 $back $back 
                        montage null: $up null: $left $front $right null: $down null: null: $back null: -geometry $imgsize -background none -tile 3x4 toTo.tif;
    }
    
    horizontalline (){
                        convert $right $left $up $down $front $back +append toTo.tif;
    }
    
    verticalline (){
                        convert $right $left $up $down $front $back -append toTo.tif;
    }
                        
    finalsize=` zenity --entry --title="Enter Cubemap final height in px" --text="height" --entry-text="4096" `
    final=` zenity --list --radiolist --title="3D software cubemap type" --column="Choice" --column="Cubemap"\
                            TRUE "Blender" \
                            FALSE "horizontal-cross" \
                            FALSE "vertical-cross" \
                            FALSE "horizontal-line"\
                            FALSE "vertical-line"`
    
                    case $final in
                            "Blender")
                            order="blendercubeMap";;
                            "horizontal-cross")
                            order="horizontalcross";;
                            "vertical-cross")
                            order="verticalcross";;
                            "horizontal-line")
                            order="horizontalline";;
                            "vertical-line")
                            order="verticalline";;
                            
                            *)
                        esac
    
    while [ $# -gt 0 ]; do
        pano=$1
        echo $pano
        echo "createPano"
        
        createPano
        
        
        #takes each face to create the final image
        $order
        
        convert -resize x$finalsize toTo.tif ${pano%.*}-cubemap.png
        
        rm cubeUp.tif cubeDown.tif toTo.tif cube????.tif cube.pto
        
        shift
        done
        zenity --info --text="DONE"


    Pass it your panos, then it should result in a lot of .PNG cubemaps ready to use to create game assets inside blend4web or blender game engine ( first option ):

    examples :
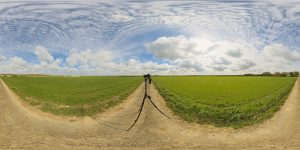
    Equirectangular pano example
    Equirectangular pano example
    Blender cubemap
    Cubemap horizontal cross Blender cubemap
    cubemap vertical cross
    cubemap vertical cross


    cubemap horizontal line
    cubemap horizontal line


    Feel free to use those examples and tell me back if I’ve done an error on the other outputs or if you encounter problems to use it . Linux only . Enjoy it , share it .

  • Compositing with equirectangular panos : (1)

    Compositing with equirectangular panos : (1)

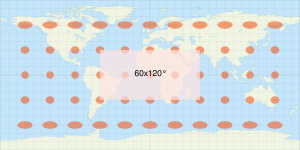
    First, considering the 2/1 equirectangular projection with Tissot’s indicatrix, we can see that the more the apparent vertical angle, the more the deformation :

    equirectangular projection
    Fabkzo’s equirectangular study

    (suite…)

  • Compositing with 360° to make stylized flat printable panos (intro )

    Now that 360° photography is a relatively common practice, and after seeing thousands of them in virtual tours, google street view, social networks etc etc , I can establish that there are 3 types of use, all implying different shoot processing:
    (suite…)

  • Example of 360° 4k video with 3d integration

    I’m able today to use equirectangular panos for video and photosimulations.
    Not only aimed to street views, pro photographers, hdri maps for renderings or games, those 360 panos can be used to produce high quality videomontages.

    To get the right scale and topo you have to produce a conformal spherical view, with a horizon error < 0.05 degrees.
    It has been georeferenced with a real topo grid; you can use the srtm if you want but it can be done with almost 5 points.
    I made this really quick sequence with blender 2.76 , make it loop or pause it to navigate.

    PS: Visualize it with chrome browser to display 360 video effect.

  • Peirce Quincuncial panos

    I’ve been searching a way for long time to make peirce quincuncial panos under Linux.

    Why? I discovered a textured 3d sphere on setchfab, available for download, mapped with a square image, rendering it like a 360 pano.

    (suite…)

  • Inkscape patterns/  les Motifs dans Inkscape sans l’outil de découpe

    Inkscape patterns/ les Motifs dans Inkscape sans l’outil de découpe

    This is a very little imaged tuto destinated to get around what seems to be a bug in Inkscape , while setting  a clip on 2 objects then trying to make the resulting group  a pattern. ( resulting in blank rectangles )

    Bonjour aux lecteurs curieux de Ubuntu-fr.org, j’espère que cela pourra en aider plus d’un 🙂

    Je rappelle que je ne me suis pas appliqué à faire quelque chose de précis ;

    [nggallery id=5]

  • (python) Playing with Pixel Art  to SVG

    (python) Playing with Pixel Art to SVG

    Hi,

    Well I’m actually searching cool stuff concerning svg. So I’ve been searching on pypi all about SVG using pip in my terminal.

    for those who don’t know it on a debian system:

    sudo apt-get install python-pip

    then

    pip search svg 

    You’ll find there a very nice little tool called ‘pixel2svg’

    I was surprised of its interest but I consider it finally very useful : rather than trying to vectorize very little pictures ( like icons ) in Inkscape, or to completely re-do it , use it to keep the pixel-art-style  with great results.

    Very simple to use, just like this:

    pixel2svg.py eboy.png

    I’ve taken a picture from EBOY ( http://hello.eboy.com/eboy/ ) to play with.

    pixel-art ,icon size
    pixel-art ,icon size

    Let see the result:

    resulting SVG

    Then let’s play with it:

    Make whatever you want now with a clean drawing

    g2961


    a styled pixel-art vecorized
    give it the style you want

    Before that I have tested the Inkscape’s vectorization tool :

    Comparing pixel2svg vs inkscape's vectorization tool
    Comparing pixel2svg vs inkscape’s vectorization tool


    Tell me if it can also be useful to you , I wonder what you would be able to do with it 🙂

    NB:  Now you can also apply this to Qrcodes . How ? Well… Have you ever tried to redirect one of them?

  • Sliding with Hovercraft!

    Hey I’ve discovered a new  python-based presentations engine:

    hovercraft logo           Hovercraft!

    « The merge of convenience and cool!

    Hovercraft! is a tool to make impress.js presentations from reStructuredText. For a quick explanation, see the demo.
    Features:

    •     Write your presentations in a text markup language. No slow, limiting GUI, no annoying HTML!
    •     Pan, rotate and zoom in 3D, with automatic repositioning of slides!
    •     A presenter console with notes and slide previews!
    •     The slide show generated is in HTML, so you only need a web browser to show it.
    •     Easy sharing, as it can be put up on a website for anyone to see!

    Full documentation is available at readthedocs.org, and also in the documentation subdirectory. »

    source: https://pypi.python.org/pypi/hovercraft

    What a wonderful tool for all webdesigners, presenters, devworkers !
    No need to use -free or not – softwares with their own extensions, no conversions needed as it makes all the work and create an index.html with css.
    But all is not as easy as you’ll have to install it on your system, before creating your first reStructuredText.

    That’s why I’ve made a little tuto for interested (and noob) people like you 🙂

    Well, first of all I work on a Linux system ( Ubuntu 12.10 ) so you’ll have to translate the commands for yours (I use apt-get to download the missing libraries.)

    Fine, so download the hovercraft folder on the dev page there: https://pypi.python.org/pypi/hovercraft

    Well done! So you’ll find there a lot of files and folders , but the interesting one is « setup.py »

    Ok, so are you fluent with Python ? ==> you can pass this part and go down to « installing missing libs« 

    If not, continue reading:

    « Python is a programming language that lets you work more quickly and integrate your systems more effectively. You can learn to use Python and see almost immediate gains in productivity and lower maintenance costs.

    Python runs on Windows, Linux/Unix, Mac OS X, and has been ported to the Java and .NET virtual machines. »

    source: www.python.org

    I won’t make a course on python there but I want you to understand you’ll have to build and install Hovercraft! in order to use it as a shell tool.

    So make sure to install python on your system using the command shell ( or terminal) :

     sudo apt-get install python3.2-dev  ( here we install python3.2 since Hovercraft has been written in Python3; it won’t work if you use python 2.7 for multiple reasons I’ll let you search on Python.org )

    Installing missing libs :

    Hovercraft! needs 2 libraries to be compiled: libxml2 and libxslt ; here we’ll download the dev versions.
    You can get them with:

    sudo apt-get install libxml2-dev libxslt-dev

    then

    sudo apt-get install python-lxml

    now if not installed, download python3-setuptools:

    sudo apt-get install python3-setuptools

    and you can finish with:

    sudo easy_install lxml

    That’s done for this part;

    Nice; there you have all to build and compile Hovercraft! on your system.

    Bulding and compiling:

    You have to reach Hovercraft! folder to see the setup.py file

     cd ~/hovercraft-1.1/
     then type « ls » to check all the contained files and folders

    ok, fire!

     sudo python3.2 setup.py build

    once finished:
     sudo python3.2 setup.py install

    Normally you’ll read some errors messages but it doesn’t mind;

    I’ll let you there discover the well-made tutos :

    linked on a dedicated page:

    https://hovercraft.readthedocs.org/en/1.0/

    In the folder Docs/examples/ you can edit all the .rst files , as they are text files and try to make them html presentations with for example:

    hovercraft tutorial.rst ~/yourdestinationfolder

    Open Index.html with your favorite browser and enjoy 🙂

    ex: http://fabkzo.com/hovercraft/tutorial.html